Axis2 AAR Maven Plugin : Handling dependencies

Found an old useful thread on handling dependencies in Axis2 AAR maven plugin. Here’s the example plugin configuration in which only needed dependencies are added into the AAR.

<plugin>
    <groupId>org.apache.axis2</groupId>
    <artifactId>axis2-aar-maven-plugin</artifactId>
    <version>1.6-wso2v3</version>
    <extensions>true</extensions>
    <configuration>
        <aarName>Calculator</aarName>
        <fileSets>
            <fileSet>
                <directory>
                    /home/isuru/foo/bar
                </directory>
                <outputDirectory>lib</outputDirectory>
                <includes>
                    <include>cal-dep-1.0.0.jar</include>
                </includes>
            </fileSet>
        </fileSets>
    </configuration>
    <executions>
        <execution>
            <id>create-aar1</id>
            <phase>install</phase>
            <goals>
                <goal>aar</goal>
            </goals>
            <configuration>
                <aarName>
                    Calculator
                </aarName>
                <servicesXmlFile>
                    ${basedir}/src/main/resources/META-INF/services.xml
                </servicesXmlFile>
                <includeDependencies>false</includeDependencies>
            </configuration>
        </execution>
    </executions>
</plugin>

How to Install OpenStack Essex on Ubuntu 12.04

To perform some experiments related to our research at IU, we wanted to have our own cloud running. So we thought OpenStack is the best option and I started installing it on a single machine. Initially I thought it will be easy to get it up and running but that wasn’t the case. It took me few days to get it up and running properly with all expected features. So I thought of writing a post which will be useful for someone who’ll try to do the same.

I installed OpenStack Essex on Ubuntu 12.04. Initially I followed the Essex Documentation to get an idea about what is what in OpenStack. But following that documentation to install Essex on a single node is very difficult because it doesn’t provide enough details about some steps and you have to perform lot of small steps which might go wrong.

However I found this post which provides a very good script which automatically installs most of the components I wanted to have. While following that, there’s one very important point to keep in mind, if you don’t have two NIC cards on your computer. You have to create a virtual network interface (eth0:0) in /etc/network/interfaces file as shown below.


auto lo
iface lo inet loopback

auto eth0
iface eth0 inet static
address 10.100.1.100
network x.x.x.x
netmask x.x.x.x
broadcast x.x.x.x
gateway x.x.x.x
dns-nameservers x.x.x.x

auto eth0:0
iface eth0:0 inet manual

Make sure you restart the networking module after changing the configuration.

After that, if you want to have floating (public) IPs assigned to your VMs, you have to get a chunk of dedicated public IPs from your network administrator and those IPs must be from the same subnet to which the host machine is connected. After doing that, you can run the script given in the above post as shown below.


sh OSinstall.sh -T all -F 10.100.1.72/29 -f 192.168.12.32/27 -s 30 -P eth0 -p eth0:0 -t demo -v kvm

If you followed everything correctly so far, the script should set up glance, keystone and nova for you and you should be able to access the dashboard through the browser. Now upload an image as directed in the above post and you should be able to create instance through the dashboard. If you have used floating IPs, you can allocate those into your project and associate with your VMs. Then you can access your VMs from anywhere through the public IP.

Configuring Nova Volumes

If you want to use your hard disk space within your VMs, you have to configure Nova volumes to do that. You have to have some unused space in your hard drive and you can use ‘fdisk’ to create a partition on that and format it as needed. To configure Nova volumes, follow this section on the original documentation.

After following the given steps, you may get an error while attaching a volume to a VM similar to the one given below in the nova-compute.log.


2013-08-22 15:58:26 TRACE nova.rpc.amqp     cmd=' '.join(cmd))
2013-08-22 15:58:26 TRACE nova.rpc.amqp ProcessExecutionError: Unexpected error while running command.
2013-08-22 15:58:26 TRACE nova.rpc.amqp Command: sudo nova-rootwrap iscsiadm -m node -T iqn.2010-10.org.openstack:<wbr />volume-00000003 -p <a href="http://129.79.107.69:3260/" target="_blank">129.79.107.69:3260</a> --rescan
2013-08-22 15:58:26 TRACE nova.rpc.amqp Exit code: 255
2013-08-22 15:58:26 TRACE nova.rpc.amqp Stdout: ''
2013-08-22 15:58:26 TRACE nova.rpc.amqp Stderr: 'iscsiadm: No portal found.\n'
2013-08-22 15:58:26 TRACE nova.rpc.amqp
2013-08-22 15:58:26 DEBUG nova.compute.manager [-] Updated the info_cache for instance 6e792ef9-e64b-4012-9daa-<wbr />923a5377517d from (pid=1410) _heal_instance_info_cache /usr/lib/python2.7/dist-<wbr />packages/nova/compute/manager.<wbr />py:2260
2013-08-22 15:58:26 DEBUG nova.manager [-] Skipping ComputeManager._run_image_<wbr />cache_manager_pass, 30 ticks left until next run from (pid=1410) periodic_tasks /usr/lib/python2.7/dist-<wbr />packages/nova/manager.py:149

Solution to this issue is given in this post.

If you successfully got through all above steps, now you should be able to create volumes and attach those to your VMs. After attaching, you can log into the VM and create a partition using the attached volume and mount it onto the file system of the VM.

Where to find nova logs

You can find all nova logs (nova-compute.log, nova-console.log, nova-volume.log etc.) in ‘/var/log/nova’ directory.

You can find instance logs for each VM you create under ‘/var/log/libvirt/qemu’ directory.

You can find some more important configurations under ‘/etc/libvirt/qemu/’ directory as well.

How to run your own Cloud on a PC using OpenStack on Ubuntu 12.04

For one of our research projects we wanted to have our own OpenStack private cloud on one of our university servers. But before trying that, I was curious to set it up on my own laptop. So I installed DevStack on Ubuntu 12.04 and played a bit with it. DevStack is the recommended option if you want to try OpenStack on your own PC. It provides the same OpenStack dashboard using which you can manage your cloud setup. In this post, I’m going to provide a step by step guide to set up a DevStack cloud.

If you already have Ubuntu 12.04 running on your PC, you can try DevStack on that. But it can make changes to your system. Therefore I didn’t want to take the risk and I went for a VM. So I installed VMware player 5 on Windows 7 and installed Ubuntu 12.04 on VMware. If you want to try the same, my previous post might be useful for you. Once you have your Ubuntu 12.04 running follow these steps.

Step 1 : Install git on Ubuntu using the following command

sudo apt-get install git

Step 2 : Install DevStack by following 3 simple steps given here. You’ll be asked to enter some passwords for different components. It will take some time to complete stack.sh execution and you’ll see following printed on your console.

Horizon is now available at http://x.x.x.x/
Keystone is serving at http://x.x.x.x:5000/v2.0/
Examples on using novaclient command line is in exercise.sh
The default users are: admin and demo
The password: xxxx
This is your host ip: x.x.x.x
stack.sh completed in 168 seconds

Step 3 : Access the dashboard by using the Horizen (name of OpenStack dashboard) URL printed above.  Log in as ‘admin’ using the printed password.

Step 4 : Before creating any instances on our cloud, we have to set up some security options. Go the the ‘Project’ tab on the left and click on the ‘Access & Security’ link as shown below.

shot1

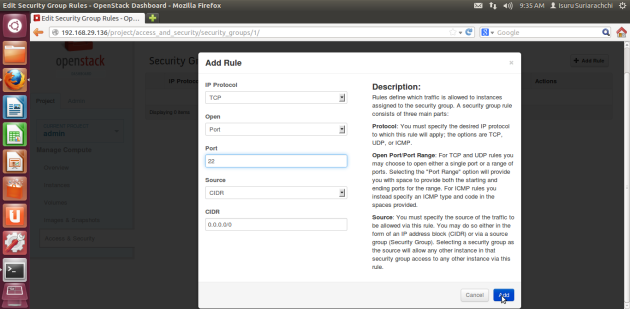
You can either edit the existing “default” security group or add a new security group. Then click on “Edit Rules” on the relevant gropu and first add a rule to enable incoming SSH connections on port 22.

shot2

Then add another rule to enable incoming ping requests on ICMP protocol. Set -1 for ICMP type and code.

shot3

So the 2 rules added should look like this.

shot4

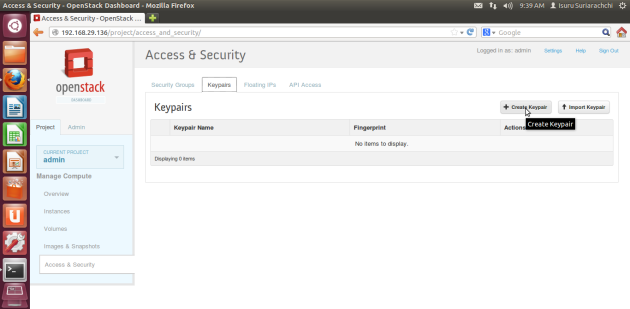
Then we have to generate a key pair which will be used to authenticate users into the VMs. Click on the “Keypairs” tab on “Access & Security” page and click on “Create Keypair”.

shot7

Then provide a name for the keypair and click on “Create Keypair”.

shot8

Download and save the key file. It will be used to log into the VMs from outside.

shot9

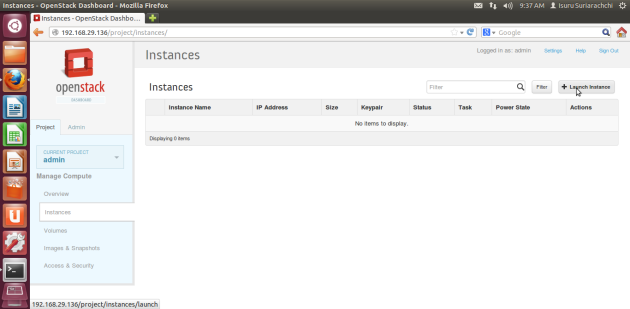
Step 5 : Now we can create an instance using the security group and the key pair we created. Click on “Instances” link under “Project” tab and click on “Launch Instance”.

shot5

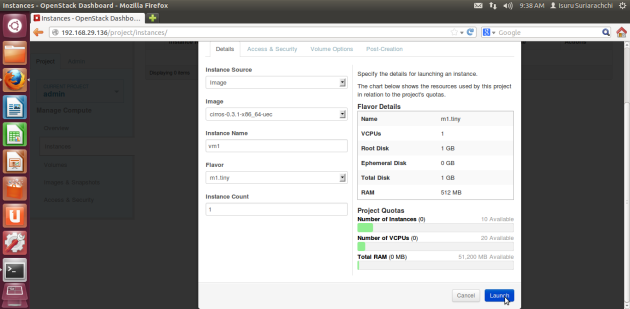
In the UI popped up, you can configure the instance by providing a name, size etc. under “Details” tab.

shot6

Under “Access & Security” tab we can select the key pair and the security group we created above.

shot10

After configuring the instance, click on “Launch”. Then wait till the instance comes into “Running” state.

shot11

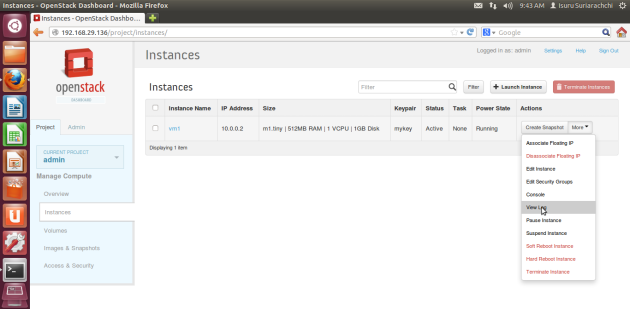
Once the instance is up and running, you can check the log and the console.

shot12

Once you get the console, log into the instance by providing the default username and password printed on the console.

shot13

When you check the log, you’ll see something like this.

shot14

Now we have successfully created an instance on our DevStack cloud.

Step 6 : Finally if you want to SSH your instance from outside using the key file downloaded, use the following commands.

$ chmod 0600 MyKey.pem
$ ssh-add MyKey.pem
$ ssh -i MyKey.pem cirrois@10.0.0.2

How to install Ubuntu 12.04 on Windows 7 using VMware player 5

While I was trying to install Ubuntu 12.04 on Windows 7 64-bit OS using VMware player 5, I found this post very useful. However In my case, I had to follow 2 additional steps which are not listed there.

  • Enable virtualization on you computer through your BIOS settings. Following image shows how to do it on a Think Pad.

DSCN2560

  • If you won’t get the Ubuntu GUI and if you will be prompted to the command line, use the following command to start the GUI.
sudo lightdm

One more thing that I noticed is, Ubuntu 12.04 Server version is not working on this setup. You can use only the Desktop version.

What is Re-reduce in MongoDB Map-Reduce?

In my previous post on Map-Reduce, we had a look at MongoDB Map-Reduce functionality using a simple sample. In this post, I’m going to explain what is Re-reduce and why it is important to know about Re-reduce when you write your reduce function. I recommend you to go through the previous post before reading this one because I’m going to use the same sample to explain some concepts here.

In Map-Reduce, the map function produces a set of key-value pairs with redundant keys. For example, if we consider the word count sample in the previous post, if we have 25 occurrences of the word “from”, there will be 25 key-value pairs like ({word:from}, {count:1}) emitted from the map phase. After all map tasks are completed, the Map-Reduce framework has to shuffle and sort the key-value pairs produced by all map tasks. This will group all values under a particular key and produce an array of values. According to normal Map-Reduce standard, the reducer will receive a particular key with an array of values which contains all values emitted by the map phase. In other words, reducer will be called only once for a particular key.

// array containing 25 values
reduce("from", [{count:1}, {count:1}, {count:1}, ...])

If we can guarantee that,  we can simply write the reduce function given in the previous post as follows.

function reduce(key, counts) {
    // we assume all values under this key are contained in counts
    return { count:counts.length };
}

However, in MongoDB Map-Reduce we can’t guarantee the above condition. When a particular key contains a large number of values, it will call the reduce function for the same key several times by splitting the set of values into parts. This is called Re-reduce.

Let’s consider the same example of word “from” again in a Re-reduce. Let’s assume MonogoDB executes the reduce function 3 times by selecting a subset of values out of the set of values available before each reduce step. Assume, first the reduce function will be called for 10 {count:1} values and that will return {count:10}.

// array containing 10 values
reduce("from", [{count:1}, {count:1}, {count:1}, ...])

Now for the key “from”, we have 15 {count:1} values and 1 {count:10} value. Then the second reduction will be called on a subset of these 16 values. Assume it’s called for 8 {count:1} values. That will return {count:8}.

// array containing 8 values
reduce("from", [{count:1}, {count:1}, {count:1}, ...])

Finally the third reduction will get an array like [{count:10}, {count:8}, {count:1}, {count:1}, …] which contains the results of previous 2 deductions and the remaining 7 {count:1} values.

// array containing 9 values
reduce("from", [{count:10}, {count:8}, {count:1}, {count:1}, {count:1}, ...])

So the output of the third reduction will be {count:25}. Note that in the above example output of the first reduction has gone into the third reduction. But that is not a must. It might have gone into the second reduction step as well.

Now you can understand the reason why we can’t implement the reduce function as given above (using “counts.length”) if we are using MongoDB Map-Reduce. We always have to keep in mind about the Re-reduce when implementing the reduce function to avoid errors.

MongoDB Map-Reduce Sample

In my previous post we discussed how to write a very simple Java client to read/write data from/to a MongoDB database. In this post, we are going to see how to use inbuilt Map-Reduce functionality in MonogoDB to perform a word counting task. If you are new to Map-Reduce, please go through the Google Map-Reduce paper to see how it works. In order to understand this post properly please go through the previous post as well because we are going to use the same collection created in that post to apply Map-Reduce.

In our previous example, we created a “book” collection inside our “sample” database in MonogoDB. Then we inserted 3 pages into the “book” collection as 3 separate documents. Now we are going to apply Map-Reduce on the “book” collection to get a count of each individual word contained in all three pages. In MongoDB Map-Reduce, we can write our map and reduce functions using javascript. Following is the map function we are going to use for our purpose.

function map() {
    // get content of the current document
    var cnt = this.content;
    // split the content into an array of words using a regular expression
    var words = cnt.match(/\w+/g);
    // if there are no words, return
    if (words == null) {
        return;
    }
    // for each word, output {word, count} pair
    for (var i = 0; i < words.length; i++) {
        emit({ word:words[i] }, { count:1 });
    }
}

MongoDB will apply this map function on top of each and every document in the given collection. Format of the documents contained in our “book” collection is as follows.

{ "_id" : ObjectId("519f6c1f44ae9aea2881672a"), "pageId" : "page1", "content" : "your page1 content" }

In the above map function, “this” keyword always refers to the document on which the function is applied. Therefore, “this.content” will return the content of the page. Then we split the content into words and emit a count of 1 for each word found in the page. For example, if the word “from” appeared 10 times in the current page, there will be 10 ({word:from}, {count:1}) key-value pairs emitted. Likewise the map function will be applied into all 3 documents in our “book” collection before starting the reduce phase.

Following is the reduce function we are going to use.

function reduce(key, counts) {
    var cnt = 0;
    // loop through call count values
    for (var i = 0; i < counts.length; i++) {
        // add current count to total
        cnt = cnt + counts[i].count;
    }
    // return total count
    return { count:cnt };
}

In Map-Reduce, the reduce function will get all values for a particular key as an array. For example, if we found the word “from” 25 times in all 3 pages, reduce function will be called with the key “from” and value “[{count:1}, {count:1}, {count:1}, …]”. This array will contain 25 elements. So in the reduce function, we have to get the total of counts to calculate the total number of occurrences of a particular word.

Now we have our map and reduce functions. Let’s see how to write a simple Java code to execute Map-Reduce on our “book” collection.

package sample.mongo;

import com.mongodb.DB;
import com.mongodb.DBCollection;
import com.mongodb.MapReduceCommand;
import com.mongodb.MongoClient;

import java.io.IOException;
import java.io.InputStream;

public class WordCount {

    public static void main(String[] args) {
        try {
            // create a MongoClient by connecting to the MongoDB instance in localhost
            MongoClient mongoClient = new MongoClient("localhost", 27017);
            // access the db named "sample"
            DB db = mongoClient.getDB("sample");
            // access the input collection
            DBCollection collection = db.getCollection("book");
            // read Map file
            String map = readFile("wc_map.js");
            // read Reduce file
            String reduce = readFile("wc_reduce.js");
            // execute MapReduce on the input collection and direct the result to "wordcounts" collection
            collection.mapReduce(map, reduce, "wordcounts", MapReduceCommand.OutputType.REPLACE, null);
        } catch (Exception e) {
            e.printStackTrace();
        }
    }

    /**
     * Reads the specified file from classpath
     */
    private static String readFile(String fileName) throws IOException {
        // get the input stream
        InputStream fileStream = WordCount.class.getResourceAsStream("/" + fileName);
        // create a buffer with some default size
        byte[] buffer = new byte[8192];
        // read the stream into the buffer
        int size = fileStream.read(buffer);
        // create a string for the needed size and return
        return new String(buffer, 0, size);
    }
}

In order the execute the above code, make sure you have “wc_map.js” and “wc_reduce.js” files on your project classpath containing above map and reduce functions. In the above Java code, first we connect to our MongoDB database and get a reference to the “book” collection. Then we read our map and reduce functions as a String from the classpath. Finally we execute the “mapReduce()” method on our input collection. This will apply our map and reduce functions on the “book” collection and store the output in a new collection called “wordcounts”. If there’s an already existing “wordcounts” collection, it will be replaced by the new one. If you need more details on “mapReduce()” method, please have a look at the documentation and java doc.

Finally let’s log into our MongoDB console and output collection “wordcounts”.

isuru@isuru-w520:~$ mongo
MongoDB shell version: 2.0.4
connecting to: test
> use sample
switched to db sample
>
>
> db.wordcounts.find()
{ "_id" : { "word" : "1930s" }, "value" : { "count" : 1 } }
{ "_id" : { "word" : "A" }, "value" : { "count" : 5 } }
{ "_id" : { "word" : "After" }, "value" : { "count" : 3 } }
...
>

That’s it. Here we had a look at a very basic Map-Reduce sample using MongoDB. Map-Reduce can be used to perform more complex tasks efficiently. If you are interested, you can have a look at some more MongoDB Map-Reduce samples here.

MongoDB Read/Write using a Java Client

Recently I’ve been working on some NoSQL projects using Cassandra and MongoDB. So I just thought of sharing some basic stuff related to those NoSQL stores which will be useful for the beginners. In this very first post I’m going to show you how to write a very simple Java code through which you can write data into a MongoDB store and read from it.

Step 1 : Install MongoDB. Depending on your environment, you can very easily install MongoDB on your machine by following the guidelines given here.

Step 2 : Create a Java project on your favorite IDE and add the MongoDB Java driver into your class path. If you are using a Maven script to build your project, you can add the following dependency into it.

<dependency>
   <groupId>org.mongodb</groupId>
   <artifactId>mongo-java-driver</artifactId>
   <version>2.10.1</version>
</dependency>

Step 3 : In this simple example, first we are going to create a database called “sample” and then add a collection called “book” into it. Then we’ll add 3 pages as documents into that collection. To be used as pages in the book collection, make sure you have 3 text files “page1.txt”, “page2.txt” and “page3.txt” in your classpath. After successfully inserting data into the database, we read the first document back from the database to make sure we’ve correctly inserted data. Here’s the Java code to do this. Read comments at each line to get an idea about what each line does.

import com.mongodb.BasicDBObject;
import com.mongodb.DBObject;
import com.mongodb.DB;
import com.mongodb.DBCollection;
import com.mongodb.MongoClient;

import java.io.IOException;
import java.io.InputStream;

public class MongoSampleClient {

    public static void main(String[] args) {
        try {
            // create a MongoClient by connecting to the MongoDB instance in localhost
            MongoClient mongoClient = new MongoClient("localhost", 27017);
            // drop database if it already exists
            mongoClient.dropDatabase("sample");
            // creating a db named "sample" and a collection named "book"
            DB db = mongoClient.getDB("sample");
            DBCollection bookCollection = db.getCollection("book");
            // insert the 3 pages of the book into the collection
            for (int i = 1; i < 4; i++) {
                BasicDBObject doc = new BasicDBObject("pageId", "page" + i).
                        append("content", readFile("page" + i + ".txt"));
                bookCollection.insert(doc);
            }
            // read the first doc to make sure that we've inserted correctly
            DBObject firstDoc = bookCollection.findOne();
            System.out.println(firstDoc);
        } catch (Exception e) {
            e.printStackTrace();
        }
    }

    /**
     * Reads the specified file from classpath
     */
    private static String readFile(String fileName) throws IOException {
        // get the input stream
        InputStream fileStream = MongoSampleClient.class.getResourceAsStream("/" + fileName);
        // create a buffer with some default size
        byte[] buffer = new byte[8192 * 2];
        // read the stream into the buffer
        int size = fileStream.read(buffer);
        // create a string for the needed size and return
        return new String(buffer, 0, size);
    }
}

You’ll see the following on your console, which is the first document on your new collection.

{ "_id" : { "$oid" : "519f6c1f44ae9aea2881672a"} , "pageId" : "page1" , "content" : "your page1 content" }

Step 4 : Finally you can see the content you inserted above through the MongoDB console by using following commands.

isuru@isuru-w520:~$ mongo

MongoDB shell version: 2.0.4
connecting to: test
> 
> use sample
switched to db sample
> 
> db.book.find()
{ "_id" : ObjectId("519f6c1f44ae9aea2881672a"), "pageId" : "page1", "content" : "your page1 content" }
{ "_id" : ObjectId("519f6c1f44ae9aea2881672b"), "pageId" : "page2", "content" : "your page2 content" }
{ "_id" : ObjectId("519f6c1f44ae9aea2881672c"), "pageId" : "page3", "content" : "your page3 content" }
>

That’s it. In the next post on MonogoDB we’ll be looking at how to use MongoDB Map-Reduce functionality on top of the “book” collection we created above.

Slow internet with Zoom 5350 Router? Here’s how to fix..

I’m using a Zoom 5350 Router and I’ve been experiencing a very slow connection specially when streaming. I thought it’s something to do with my ISP and called them. But they couldn’t find any issues with my connection. After trying many things, finally I found that the issue is with my Router. Actually what you have to do is a very simple configuration change to disable IP Flood Detection which is enabled by default. See this for more details.

Developing Secure JAX-WS Web Services with WSO2 AS

WSO2 AS supports Apache CXF as the JAX-WS framework from next release on-wards. Applying WS-Security on JAX-WS services is an important use case when developing web services. CXF supports two ways to configure WS-Security on JAX-WS services.

  1. By using custom configurations in the cxf-servlet.xml file. This is the old way and it’s documented here. When a service is secured using this method, there won’t be a Policy on the WSDL and the clients can’t get needed Policy information to invoke the service just by looking at the contract. Therefore this is not a standard way of securing a service. A useful post on using this method can be found here. On WSO2 AS trunk, you can find a this type of sample here.
  2. By using WS-SecurityPolicy language. It’s documented here. This is the standard way of securing a service. Here, the service author has to include the Policy in the WSDL and engage it with needed bindings. Only the configurations like key store locations, callback handlers etc. should be done through the cxf-servlet.xml. A nice article which this kind of samples can be found here. And on WSO2 AS trunk, there’s a UT sample of this type here.

Both these methods are still supported. But the second one is the recommended way of doing it.

4 years at WSO2

Yesterday morning, accidentally I realized that I’ve been with WSO2 for 4 years. Joined the company on the 12th of May 2008 just after completing my CSE degree. Supun, Milinda, Saliya, Kalani and Rajika were the other batch mates who joined with me and Sameera joined a week later. Looking back, it has been a wonderful period of my life. I’ve learned a lot, gathered so much experience specially at customer sites and made lots of friends.

Just after joining the company I was assigned into WSO2 WSAS team and Azeez was my very first product manager. I still remember how we worked for our very first Carbon release. It was my first release experience and we had to put in lot of effort to get the release out. However I never felt tired and it was fun. I’ve written this post on the 31st of December 2008 with all my feelings about the company and the start of my career.

In addition to the technical experiences that I’ve gathered, I’ve made lots of friends at WSO2 who contributed a lot to make these 4 years unforgettable. Specially the annual “Adyapana Charikawa” 🙂 organized by Charitha, has added loads of fun memories. In addition to that I always enjoyed playing Carrom, Table Tennis and Basket Ball with our guys whenever we get a chance.

Having spent such a wonderful time, most probably I’ll be leaving the company for my studies in August. It’s little sad to think about leaving all my WSO2 friends. But still I don’t think about that too much as I’ve got 3 more months to enjoy with them :).